Showing posts with label Tutorials. Show all posts

Saturday, July 9, 2011

{Recycled Crayons}

I'm definitely not the first or last person to do this, but I wanted to share since my daughter was thrilled with this project!

My 3 year old loves to purposely break crayons and remove the paper.
Drives. Me. Crazy.

Making recycling crayons was the perfect project for her. I took a couple pictures of the process, which luckily is simple since I somehow lost those pictures.

*Recycled Crayons*

Preheat Oven to 275 degrees
Spray cupcake tin with pam- I used a mini one.
Set your little ones to work removing any paper on crayons
Break crayons into small pieces to fit cupcake tin
Bake for 5-7 min or until melted, stir, keep an eye on them, they melt fast.
Let cool completely

When they were ready, I wiggled the pan a bit, turned it upside down, tapped on them and they all came out pretty easy.


My daughter kept saying "Oh! I love them"
And I loved that I did have to keep finding broken crayons or paper around!

*Just a warning, I've heard you can use silicone molds, but the crayons will stain them so you probably won't want to bake in the afterwards. Probably be safe to use a metal pan or something you don't care about ruining :)

Friday, October 22, 2010

{Lace Flower Tutorial}

Today I made one of the cutest, easiest flowers ever!
In case you haven't noticed, I'm a sucker for pretty flower accessories! Want to make your own?

Let's get started.
{again, I apologize for the quality of the pictures,
still working with a broken camera here!}

You need:

decorative lace trim
small circle of matching felt {the size you want your flower}
glue gun
pin back or clip

I bought my lace at Hobby Lobby on sale for $1, an awesome price for 12 feet of lace. It didn't give a width, but mine was about 3/4" wide, this is what the packaging looked like:


1. add a thin line of hot glue around the top edge of your felt circle and attach your trim.
2. continue working from the outside in, adding more hot glue and attaching as you go.
3. The picture doesn't show this step well, but when I got about an 1.5" from the end, I added a dab of glue and rolled the last bit in. Then I added a dab to the center of my flower and pushed the rolled end down to create a rolled center. I hope that makes sense...


To add the pin back, cut a piece of felt slightly larger than your pin. Mark lines where the ends are, cut small slits along those lines. Then open your pin, feed the pin through one slit and the closure through the other slit. This step is optional, you could just glue your pin straight to the back of your flower, I just find this gives a more finished look and gives a better hold with the pin sandwiched between two pieces of felt glue together...


Glue your pin to the back of your flower, add it to a shirt and your done!


You could attach an alligator clip to the back as well and easily switch between a brooch or flower clip...


OR add a strip of folded tulle through the pin before attaching...

and you have some cute temporary tulle leaves on your flower...

...that you can easily remove if you want a simpler look...


I can't wait to get lace in a few different colors. How easy would these be to add to a pillow, necklace, purse...or how about these in place of these fabric flowers for the 3d wall art I made here.

Make sure you check out this week's link parties to the right --->
Have a great weekend!


Saturday, August 28, 2010

Glazed Wall Art

I have a favorites folder called "Project Ideas", packed full of tutorials or online catalog pictures. I'm way in over my head with these ideas, I'll never have the wall or shelf space for them all. While "spring cleaning" this folder, I came across this Glazed Wall Art.


I have tons of scrapbook that would be great for this.

Clicky HERE to see the deets on making this project.

Tuesday, August 24, 2010

Oops I Craft My Pants

I'm always happy to find a good DIY blog...throw in a hilarious title and some great humor and I'm in love. I don't remember how I came across Oops I Craft My Pants, but I had a feeling I'd like it just after reading the title. Erika just started doing a "tute-in tuesday" feature on her blog where you can check out other's great tutorials.

Go check it out!


Wednesday, August 18, 2010

{Life Made a Little Easier}

Ok, maybe just {blogging}, not life.

My friend Aimee gave me this tip today on how to set your blog up for the new bulk photo uploader setting. This setting brings many new features, like being able to copy and paste within the compose section of your post, rather than the {html} section, being able to change your picture size within the post once you've uploaded them and the option to see a preview of your post exactly like it will appear on your blog page prior to posting. No more posting and then realizing something is cut off, or not centered!
Thank you blogger!

Now I believe all blogger users setting will eventually convert to this, but if you don't want to wait, let's getting started on those new settings now!

First..go to your dashboard and select settings

Scroll all the way down and select {updated editor} then click save settings at the bottom.


And you're done!

Now when you go to upload photos from your computer, click {chose files}

And now you can highlight all your photos and upload them at once!

Hello Time Saver!

No more clicking each {add photo} box and searching for the same picture folder over. and over. and over.
Not to mention the time you had to wait if you wanted to upload more than 5 photos at a time!

*One other tip, to change the photo size during the {compose} setting, click on the photo and a edit box will pop up that allows you to change the size, alignment, and add a caption.

*Also! It has a strike through strikethrough text option now on your toolbar now...a definite headache saver for any html challenged folks :) Just a highlight the text you want to strike out and you're done.

Thanks Aimee for sharing this tip with me!

Happy Blogging!


Monday, June 28, 2010

{Guest Blogger}

Remember this wreath?

No? It's been awhile...

Melanie at The Crafty Cupboard has my {version} of the yarn wreath tutorial up on her blog today.

If you haven't seen it before...
Or need to refresh your memory.
Go check it out!

If you haven't visited The Crafty Cupboard before, then you really need to go check it out!


Happy Crafting!

Tuesday, October 6, 2009

White Pumpkins

++Warning! Super easy, inexpensive project++

Do you love all those fake white pumpkins they have out this fall? I've seen them everywhere, and even the smallest ones can cost $5-7 a piece. I'm all about doing something cheaper myself if I can.

If you have $5 and a dollar store nearby, go pick up some of those hideous dollar store pumpkins for a $1 a piece (you know the ones that are an awful orange, speckled with shades of green, brown and yellow) some white craft paint, and spool of ribbon. Paint your pumpkins*, tie bows around the stem, put on shelf or add to centerpiece...easy peasy!

*They are plastic, so I had to do two coats.

If you like the classic orange pumpkin color, you could still paint them a pumpkin orange. I've yet to find even small solid normal orange pumpkins for a $1.00. Feeling extra crafty? Add some cute black vinyl lettering that says "BOO" or "EEK".

That cute little "FAITH" shelf sitter is by Olde Country Cupboard.

Monday, October 5, 2009

Re-purposing Clothing!

Every now and then I get a serious sewing itch! Now that I know we are having another girl, its given me an excuse to start sewing some new things. *Did I mention we found out we are having another girl??* I saw an idea for re-purposing an old skirt and shirt on makeitandloveit.blogspot.com. I realized I had a skirt that I never wear (zipper always stuck on it and its gotten a little snug!) and my daughter had a shirt she put a hole in it that would match PERFECT!


Ashley from Make it and Love it suggests doing a gathering stitch around the skirt and sewing it to the shirt..I did this and it just looked plain silly on my little one! She has a bit of a belly (got to love baby fat!), and sadly it looked like a mini maternity dress on her! I decided to tear it apart, cut the skirt to size and re-sew it. It didn't look finished so I picked up some brown with white swiss dot fabric and sewed a tie along the empire waist so it ties in the back and attached a bow to the front.


I have to say I love how it turned out in the end! Well worth tearing it apart and re-doing it.


I was super excited when I had enough left over fabric to make a matching skirt for the baby!


Best part is I originally bought the shirt for a couple bucks at Kid to Kid and the skirt I bought on clearance at Walmart in college, I don't remember how much it was, but being that I was in college I doubt I paid more than $6-7 for it. Feels great to extend the life of both things!

If you've done any clothing re-purposing, I'd love to see a link. I'm always looking for new ideas!

Saturday, September 19, 2009

Fabric Pumpkins

Fall is officially just a few days away in the US. Crazy! Here in Utah, it got pretty cold and started snowing early last October. (Maybe that's not really early around here- last year was my first fall/winter here) I'm not sure I'm ready for snow again already, but I am ready to put out some fall decorations!

Last year I made these fabric pumpkins...

Easy Peasy Project! Ok, I might have had some frustrations with the first one I made, but my sewing machine was a bit dusty and it was purely my fault! If you are itching to make some inexpensive and easy fall decorations, give this one a try. You can find directions HERE. Mine are not nearly as cute as the ones in the tutorial. I think half of mine came out more like gourds than pumpkins? I think some sprucing up is in order before they go out this year!

Let me know if you make some. I'd love to see!

Know of any great tutorials for easy fall decorations or recipes? Leave a comment with the link!

Saturday, May 9, 2009

Yarn Wreath Tutorial

You've probably seen the yarn wreaths that have become popular over the last year. Love them... The price tags on some...not so much!


Want to make your own for around $5?

Let's get started!


Here's what you need:

1 Styrofoam wreath- Any size will do...I got mine at Dollar Tree.
Yarn
Fabric scraps, thread/needle, buttons, ribbon, and felt...or pre-made embellishments
Scissors
Hot Glue Gun
Patience :)

*I have to apologize about the funky lighting in the pictures! One of the joys of apartment living, very little lighting!

Start by hot gluing the end of your yarn to whatever side you want to be the "back" of the wreath.

Now start wrapping the yarn around the wreath to your hearts content. I wrapped mine so the yarn was just touching, not overlapping, but you could go crazy and just wrap until it's completely covered (I think I will overlap a bit next time for more depth). At first I was cutting the yarn into long piece making it a bit more manageable to wrap, but I got tired of hot gluing all those end pieces.
I found if you just keep your slack fairly short on the ball of yarn, it makes wrapping easier. Keep yourself sane and do this while watching TV or something.

Keep wrapping until its fully covered and glue your end piece to the back.

If you have pre-made embellishments, the rest is easy, just glue them on and your done! If you want to make your own, here's how I make what I like to call a floppy poppy. Lame name, I know...maybe there's a real name for them, but I'll call it that for now!

Cut 3-5 circles out of scrap fabric in varying sizes. I freehand these, get your smallest circle cut and use it as a guide to cut the rest of the circles larger than the last. Don't obsess over them being perfectly round, trust me, none of mine are!


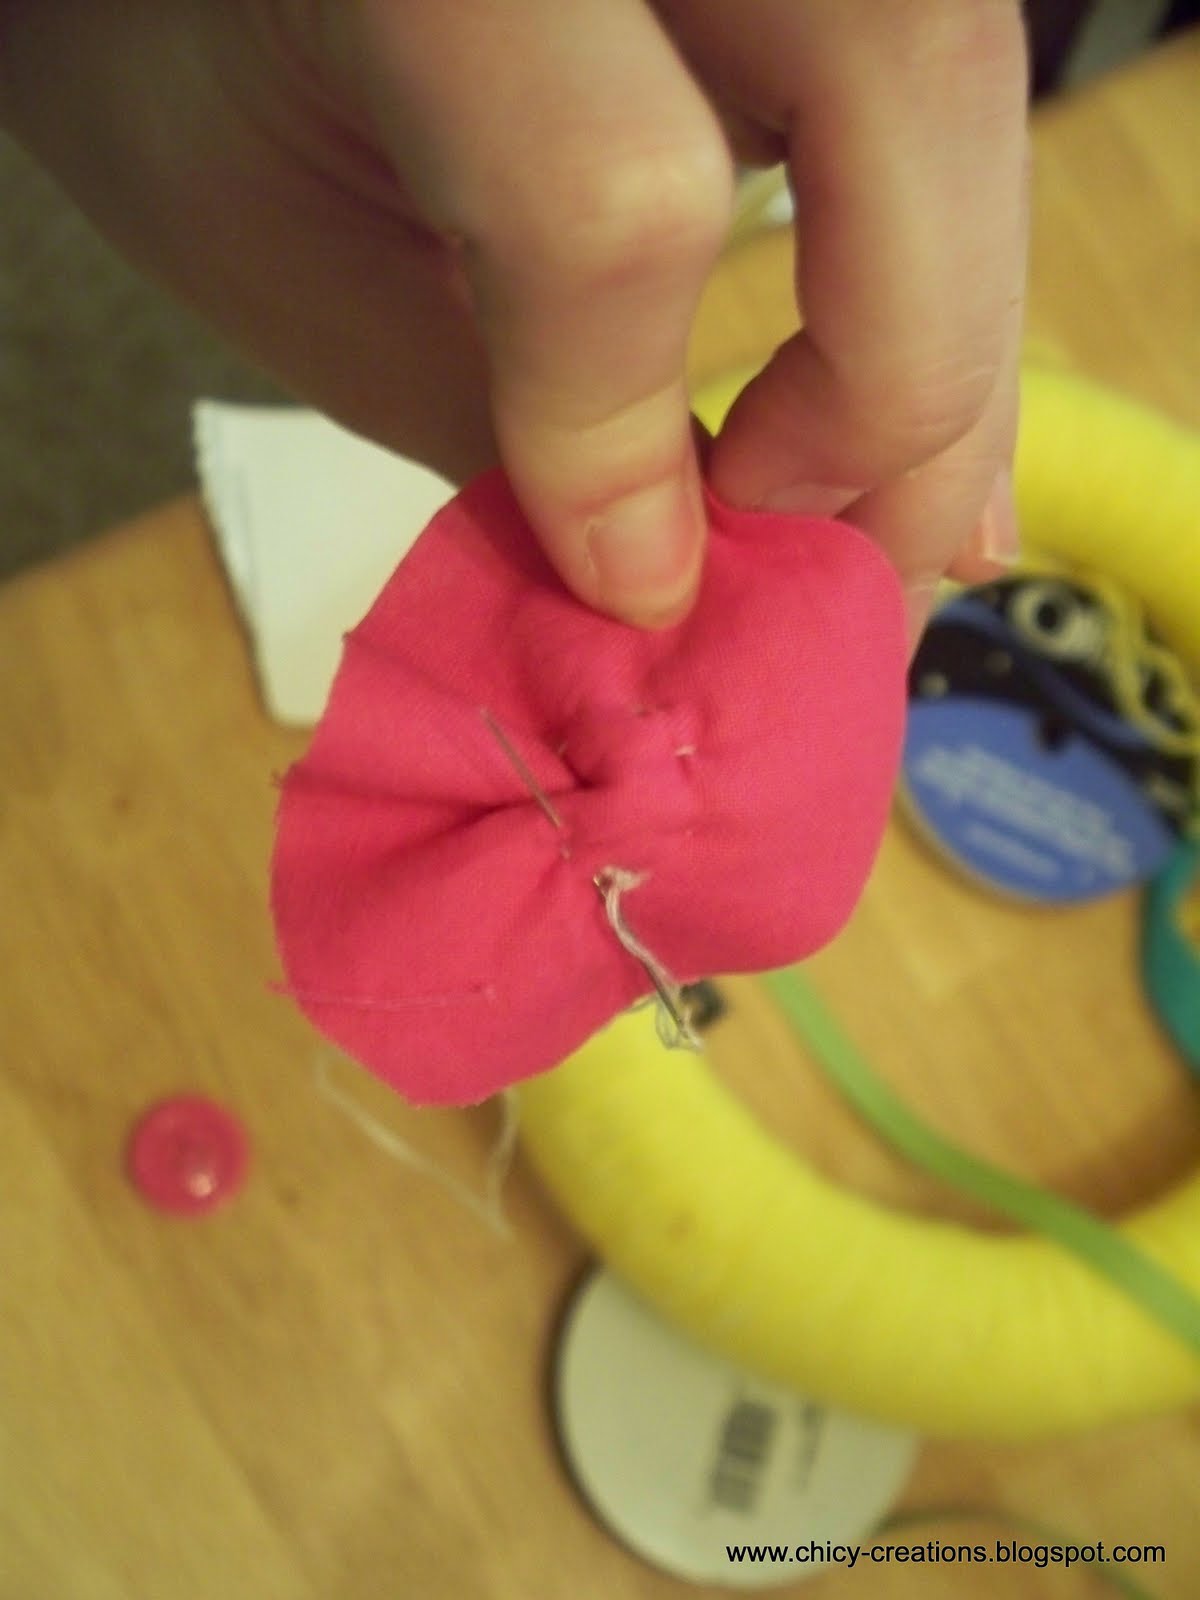
Thread your needle and knot the end. Stack your circles how you want them, then starting from the bottom (underside) of your circles, weave your needle up and down, bunching the fabric on the needle, and slightly turning the circle as you do this. Did that make any sense? I hope so.

When your needle is covered, pull it through and slightly tug until the fabric gathers.


Continue sewing like this until you've sewn a circle in the center. Make sure you pull the thread tightly, the tighter you tug the more gathered and "floppy" your flower will be. Your final stitch should end on the bottom, and then knot off your thread.


To finish my "poppy" I sewed a button in the center. I wanted my flowers to have a frayed look, so I took the edges and rubbed them fairly hard against the palm of my hand.


Before attaching my flowers, I hot glued some green ribbon to the wreath, to do this I glued the one end to the back, and winded it back and forth on the front, placing dabs of glue where I wanted it to "twist".
Attach your flower, and a ribbon leaf if you want.
Now go crazy making as many little flowers or embellisments as you want to use to decorate it. Some simple faux flowers would be cute as well! The possibilities are endless!
When I finished the wreath, to make hanging easy, I hot glue a strip of ribbon around the top of the wreath, then I looped another strip of ribbon under that piece of ribbon and tied it into a bow at the top. I put a couple of stitches through the center of the bow so it wouldn't come undone when its hanging.


Easy, right? If you did one in pink and brown or blue and brown, how cute would that be for a baby shower gift? Maybe attach a couple of those tiny frames in it so they can add pictures of their newborn and the baby's stats! If you want to make one that you can dress up differently for different holidays or seasons, use straight pins or floral pins to attach your embellishments and you can easily mix things up year around.

Happy Crafting!

Saturday, April 25, 2009

Photo Editing in Picasa

I had some spare time yesterday after editing about 60 product photos and thought I'd do up a tutorial on editing product photos in Picasa while I was in the program. First of all, I want to warn I am not a photographer by any means, but I've found Picasa to be so easy and quick for spiffing up product photos a bit! I uploaded the photos to max size I could on here, so click the photo if you are having a hard time seeing.

If you don't have Picasa on your computer, download it here. It's through google and free to download. My favorite part is you can upload up to 4 pictures straight from Picasa to your blog and you can do mass exporting to any file folder on your computer.

Onto the Tute!

This is the photo I'll be using to edit for this tutorial:


After you download and open picasa, it will pull a copy of all photos saved to your hard drive and will keep them categorized in folders named the same as the original "picture" folders on your computer. I hope that makes sense!

Double Click on the photo you want to edit and your screen will look like this:


First do any cropping needed. I like to crop all my product photos to square, so that nothing will be cut off in my product listings thumbnails.


After you click Crop Photo, it will give you several crop options as well as a manual option. If you want to crop your photos to be square, select the square: cd cover in the drop down menu. Below will show three different "cropped" examples. Click on the one that looks the best, don't worry you can adjust the actual crop if needed. Picasa will put everything in gray around your picture that you want to be cropped out of the photo. You can adjust your "crop box" by click on the corner of it. After you've adjusted your "crop box", click apply. You can click preview first to see if it's exactly how you want it to be cropped.


Now your photo will be cropped. If for some reason you don't like how it came out, you can always click undo crop and start step one over!


Next I like to do any tuning needed. If my photos are dark, I adjust the fill light. Use your pointer arrow to move the "fill light" bar over until you are happy with the result! Not too much though or you'll fade out your photo!

Next I tune the "highlights", move the "highlight bar" over until you think it looks right. Really that's all photo editing is! Messing with it until you're happy with the result. The "highlight" tuning is great to use if you've shot your photos on a white background, this will brighten the white and give it a crisper look. Don't "highlight" too much though, or it will cause a glare.

Are you starting to see a difference?
Sometimes after doing the "fill light" and "highlight", it will cause the actual color of my product to look lighter than it is. This is when I will use a little of the "shadow" tuning to help adjust the color to be a little darker to reflect the original color.


Next I add any effects needed/wanted. For this photo I added a "glow" effect. This difference is slight, but it again helps to brighten up the photo a bit. You can also try the soft focus or sharpen button if your photos need it!


Once you are happy with your finished photo, you need to "export" it. At the bottom of your picasa screen, you'll see a folder shaped icon that says "export". When you click this you can select what file folder you want to export your pictures to. I have mine seperated into product categories with date subfolders. (Ex. Product Photos\Flower Clips\April 24). Categorize and export whatever way is easiest for you.
After you select what folder to export to, add any other option. I export all product photos to 1000 pixels (recommended by etsy for product pics). Also, you have the option to add a watermark to your photo. This will add whatever text you've entered in the watermark box to the bottom right hand corner of your photo. Once you've got all options checked off, click OK and your photo will be exported and ready to upload to your etsy listing!

Here's the finished edited photo:

Here's the before photo one more time:
Picasa is great for editing and exported a large quantity of photos at one time. When you are editing, there's a little green button next to your photo tray on the bottom left of your screen. Click that and it will save that photo you are editing to your "tray". Do this with every photo you want to export. When you do export, it will export (as well as re-size and watermark if needed) all photos in your entire tray at once.
Whew, that was a little long winded! Hope it all made sense and helps someone looking for a free way to edit photos! Picasa is fun for editing just about any photo! Play around with the program and have fun.
Happy Photo Editing!
Related Posts with Thumbnails