If you don't have Picasa on your computer, download it here. It's through google and free to download. My favorite part is you can upload up to 4 pictures straight from Picasa to your blog and you can do mass exporting to any file folder on your computer.
Onto the Tute!
This is the photo I'll be using to edit for this tutorial:
After you download and open picasa, it will pull a copy of all photos saved to your hard drive and will keep them categorized in folders named the same as the original "picture" folders on your computer. I hope that makes sense!
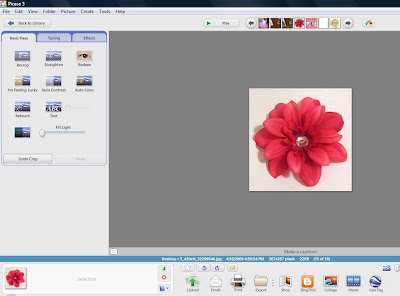
Double Click on the photo you want to edit and your screen will look like this:

First do any cropping needed. I like to crop all my product photos to square, so that nothing will be cut off in my product listings thumbnails.
After you click Crop Photo, it will give you several crop options as well as a manual option. If you want to crop your photos to be square, select the square: cd cover in the drop down menu. Below will show three different "cropped" examples. Click on the one that looks the best, don't worry you can adjust the actual crop if needed. Picasa will put everything in gray around your picture that you want to be cropped out of the photo. You can adjust your "crop box" by click on the corner of it. After you've adjusted your "crop box", click apply. You can click preview first to see if it's exactly how you want it to be cropped.

Now your photo will be cropped. If for some reason you don't like how it came out, you can always click undo crop and start step one over!

Next I like to do any tuning needed. If my photos are dark, I adjust the fill light. Use your pointer arrow to move the "fill light" bar over until you are happy with the result! Not too much though or you'll fade out your photo!
Next I tune the "highlights", move the "highlight bar" over until you think it looks right. Really that's all photo editing is! Messing with it until you're happy with the result. The "highlight" tuning is great to use if you've shot your photos on a white background, this will brighten the white and give it a crisper look. Don't "highlight" too much though, or it will cause a glare.
Sometimes after doing the "fill light" and "highlight", it will cause the actual color of my product to look lighter than it is. This is when I will use a little of the "shadow" tuning to help adjust the color to be a little darker to reflect the original color.

Next I add any effects needed/wanted. For this photo I added a "glow" effect. This difference is slight, but it again helps to brighten up the photo a bit. You can also try the soft focus or sharpen button if your photos need it!

Once you are happy with your finished photo, you need to "export" it. At the bottom of your picasa screen, you'll see a folder shaped icon that says "export". When you click this you can select what file folder you want to export your pictures to. I have mine seperated into product categories with date subfolders. (Ex. Product Photos\Flower Clips\April 24). Categorize and export whatever way is easiest for you.
After you select what folder to export to, add any other option. I export all product photos to 1000 pixels (recommended by etsy for product pics). Also, you have the option to add a watermark to your photo. This will add whatever text you've entered in the watermark box to the bottom right hand corner of your photo. Once you've got all options checked off, click OK and your photo will be exported and ready to upload to your etsy listing!
Here's the finished edited photo:
Here's the before photo one more time:
Picasa is great for editing and exported a large quantity of photos at one time. When you are editing, there's a little green button next to your photo tray on the bottom left of your screen. Click that and it will save that photo you are editing to your "tray". Do this with every photo you want to export. When you do export, it will export (as well as re-size and watermark if needed) all photos in your entire tray at once.
Whew, that was a little long winded! Hope it all made sense and helps someone looking for a free way to edit photos! Picasa is fun for editing just about any photo! Play around with the program and have fun.
Happy Photo Editing!


5 People Had to Say...:
Thanks for tutorial! That was great! I have picasa, but haven't used it yet.
I love Picasa! I've been using it close to 3 1/2 years and it's so easy to use! Thanks for the tutorial!
Grabbed your button & put it on my blog, know you from Twitter! Come see, http://itsinthebag2007.blogspot.com/
Wow. I really need to get some good photo editing software. I haven't heard of this one before. Thanks for sharing it.
Michelle
I love picassa! photoscape and picnik are great too, and so is paint.net! they all have diff features so I plug photos around in them to get my end result (why do they all start with "p" ?)
Post a Comment